Wednesday, May 6, 2009

Sick Day/Old Drafts

I stayed home sick from work today because I woke up with a killer sore throat. While trying to rest but unable to sleep I thought I would catch up on some blog posts. I was looking through some of the drafts of posts I had started but never finished, and I started thinking about "finishing things"... Jason complains from time to time that I "start things but don't finish them." He's right about that, but I'm not quite sure exactly why I do that (or rather, DON'T do that!). It could be a number of reasons: I'm easily distracted; I have so many interests that it's hard for me to focus on just one thing at a time; I attempt to take on more than I can handle; I spread myself too thin; I'm a perfectionist so I would rather have something unfinished than finished poorly.

I think that any of those could be accurate statements about me, but I think that the root of the problem is that when I look at these works in progress, I don't seem them as projects that have been abandoned, but rather things that just have not been finished yet. I think that maybe I just operate on a slower timeline than other people for finishing things, and I am okay with that.

So anyway, I had a few unfinished blog posts. Most of them were about recipes that weren't really that great anyway, so I just deleted them. But one of the draft posts made me laugh, because it was my notes from our vacation last summer. Each day I logged in and made little notes about stuff that we did or things that happened, with the intention of eventually writing a vacation recap. But I didn't want to spend the time to actually write the recap while we were on vacation, and when we got home I was a little daunted by the enormity of the task, so I just let it go. But I wanted to share the notes because I think they are funny to read, especially without the context behind them!

To give a little background: Jason and I had driven down to Nags Head, NC with our two dogs to celebrate him being finished with taking the bar exam. One of my coworkers teases me because when I returned from our trip and I was asked how my vacation was, I responded with something like, "It was nice but there wasn't really anything to do there..." He said, "well isn't that the point? You are just supposed to relax!" He's right, but I need a little mental stimulation in addition to my relaxation time. And unfortunately Jason and I have different desires when it comes to vacationing. I like to go sightseeing and do things that I couldn't normally do in my daily life in Ohio... not sit in a bar for hours and watch a televised sporting event while my husband slowly gets drunk. But marriage is about compromise, so he has learned to humor me when I want to do touristy things, and I have gotten a little better about at least TRYING to relax and have a good time doing nothing. And I think our Outer Banks vacation had a decent balance of the two. Judging from my notes below, apparently the most notable thing was where and what we ate. So there, I've brought it back full circle to my food blog. :-)


to recap:

- newport news hotel, stitch nervous

- dinner at baileys (?), french fries/tall beer

- forgot toothpaste/toothbrush

- arrive at rental unit, directly behind office

- stitch's stairs freak-out

- walk to slammin sammys for lunch

- nap

- groceries at food lion

- walk to red drum for dinner

- drinks at slammin sammys but last call at 11

- wake up around 7, drive around next morning (Monday) to orient, park and walk to beach just for a few minutes, go home because forgot cell phone

- coffee and bagel from dunkin donuts

- wake jason up and we head to beach around noon

- head back after about 45 mins because so hot, eat sandwiches/leftovers for lunch

- jason naps while I... read?

- drive to Ben Franklin to buy beach chairs/flip flops for him/spray sunscreen

- dinner at OBX brew station, wind powered

- few more groceries at Harris Teeter

- drinks at Slammin sammys

- Tues morning: wake up later, drive to get coffee and cinnamon roll around 9

- head to beach around 10:45, still freaking hot, leave around 12:30 because few groups of people spot jellyfish

- go shopping while Jason naps; get some Sanctuary Vineyards wine

- Jockey's Ridge State Park to watch sunset

- New York Pizzeria Pub for dinner

- Karaoke at Slammin Sammys and then to bed

- Wednesday; up at 7, get ready to take dogs to beach, leave by 8. Stitch gets tired, Foxy loves running back and forth with water

- Breakfast at Stack Em High

- naptime

- beach, really choppy and rough waves

- dinner at Kelly's

- drinks and us nat'l soccer game at Slammin Sammy's, but close early

- Thursday; sleep in, sunbathe on deck and get BURNED

- shower and drive up to Duck, visit Outer Barks, also buy fudge and nuts

- attempt to go to sunset grille but parking was mess, ate at Barefoot Bernie's instead

- hang out at home to watch Project Runway, decide to have night in (to Jason's disappointment), try to play Sorry but directions only in Spanish, look up card games on internet but not much fun

- at some point did laundry and found boogie boards

- Friday; head to beach by 10:30, back around 1

- lunch at lucky 12 tavern

- shop at ocean's 1/11 and jockey's ridge candies, buy more AMAZING fudge

- relax at home for a few hours, jason naps

- head to port o'call for dinner; weird antique store vibe and okay food. stay to see band in the saloon

- Saturday; Jason REALLY sunburned, sleeps in and sleeps a lot of the day. Buy hemhrroid cream to help. It had also rained and was cloudy so no beach.

- lunch from NY pizzaria again: superoni and buffalo wings carryout

- drive back to port-o-call to buy t-shirt, then take walk on beach last time

- walk to red drum for dinner and eat at bar


Pretzel Mixes


First, a house update for those of you scoring along at home: we have finished replacing the carpeting with wood laminate flooring in four out of the five rooms we are doing. The fifth room is prepped and ready to go (as in carpet and padding removed, tack strips/staples/baseboards removed, and walls freshly painted) but it's a big room so we've been waiting until we have a solid weekend to devote to doing the floor. We also still have to do a few closets (wanted to save those for last so we could try to use up scrap) and all of the baseboards (we are going to hire someone to do those for us after many frustrating failed attempts to install them ourselves without gaps). Then there are some various to-do's left, like hanging some framed items that are either new or things we took down when we painted. It still feels like our list of things to do is about a million items long, but at least it's been shortened from the ten million it felt like we started with! Someday I will share pictures here of the fruits of our labor.

Okay so onto the food. Recently I tried two different recipes for pretzel mixes: one sweet, and one savory. I think they were both from allrecipes.com, where I was searching for a recipe to use up the rest of a big bag of pretzels. The sweet one was interesting, but I probably wouldn't make it again. I made it because I saw the recipe and was intrigued. The savory one was delicious. I made it because when I saw the recipe I immediately thought "My dad would like that!" So I made some and sent it off to him in a container for his birthday.

(The photo above is of the sweet mix, but the savory one pretty much looked just like it: stuff baked onto mini pretzels!)

Here are the recipes:

Cinnamon Bun Pretzel Mix

1/3 cup brown sugar
1/2 teaspoon cinnamon
1 egg white
1/2 cup dried cranberries
1/3 cup pecans or walnuts, roughly chopped
4 to 5 cups miniature pretzel twists

Preheat oven to 275 degrees F and line a baking sheet with sides with parchment paper. (I used a jelly roll pan.) Combine brown sugar and ground cinnamon; set aside. Whisk egg white in large bowl. Add dried cranberries and nuts. Stir. Add miniature pretzels. Sprinkle with brown sugar mix and gently fold until combined, being careful not to crush the pretzels. Spread onto prepared baking sheet. Bake for 45 minutes, stirring every 15 minutes. Remove from oven and stir, evenly distributing nuts and berries. Spread in a single layer to cool completely.


Bar Stool Pretzels

1 cup butter
2 tablespoons Worcestershire sauce
2 tablespoons garlic powder
1 envelope dry onion soup mix
1 dash Tabasco
20 ounces of miniature pretzels

Preheat oven to 250 degrees F. Melt butter in saucepan. Stir in the next four ingredients. Coat pretzels in mixture and spread onto baking sheet with sides. Bake for 1 hour, stirring every 15 minutes. Cool completely.

Friday, April 17, 2009

Another version of the Easter Cake story


I hope she doesn't mind me sharing this but my sister Gretchen also wrote a funny blog post about the cake we made for Easter, and it has some great pictures including a reaction shot. =)

Check it out here.

Tuesday, April 14, 2009

Easter Cake

So, I'll try to keep this brief, because the pictures really tell the story better than I could. In a nutshell:
  • I was going to my Mom's for Easter dinner. I decided to use this as an opportunity to bake a new recipe.
  • I made an easy but impressive recipe that I found here.
  • Something went wrong with the icing... I followed the recipe to a T but apparently it needed to set up longer before I used it to ice the cake. It gradually melted and slid right off the cake.
  • I had gotten an awesome book from the library called "Hello, Cupcake!" which included instructions for making some cute candy butterflies. I thought it would be fun for my sisters/mom and me to try making the butterflies and put some on top of the cake for extra decoration. See a successful execution of those butterflies here.
  • Once we realized how unsophisticated our butterflies were turning out, and that the cake was melting away into a puddle of ugliness, Gretchen and I got the idea that it would be funny to just go all out and stick butterflies all over the cake, thus making it the gaudiest Easter cake ever.
  • It actually tasted ok. I will probably make the recipe again but do it right. =)

Wednesday, March 25, 2009

Bad Cakes and Better Cakes (but still not Good)


Bad Cake

On March 17 I had my third of four cake classes, decorating the second of three cakes we would do in the course. In this class we learned shells and dots, which could be used for decorative touches and borders, as well as to pipe figures like the clown bodies shown above (the heads are little plastic pieces on stems that you stick into the icing). I was having a very "off" night and things did not go quite as well as I felt they had with my first cake-decorating attempt. There were probably a number of factors involved but one of them was definitely the fact that I was not looking forward to doing that week's clown cake. I think clowns are creepy! But I tried to make it fun and used white, green, and orange icing in honor of St. Patty's Day.

For some reason I was having a really tough time doing the shell decoration, which is embarrassing because that is supposed to be a pretty easy one! But they just weren't coming out right. When I went to pipe the shell border on the cake I tried using a color-striping technique, where you paint strips of the dye on the inside of your pastry bag so it makes stripes when you squeeze the icing through it. I used green stripes and white icing. But I was doing so poorly on the border that my teacher actually made me stop (more than once!) and practice on our practice boards before going back to the cake. But in doing so I ended up with noticeable differences in the placement of the color stripes and in the strength of the color on the cake. Towards the end, when I got to the bottom border there is almost no stripe at all! FAIL.

The second FAIL is those awful green dots on the top of the cake. The sample clown cake they showed in the book had dots on the side of the cake, but something was weird with the tackiness/consistency of my icing that night and when I tried to do dots on the side of the cake they were actually falling off!!! So I just sprinkled a bunch of them all over the top of the cake to fill up the empty space around the clowns. Ugh, it's so ugly it seriously belongs on Cake Wrecks. You know what though? Cake is cake, and when I set it out at work the next morning it was gone by lunchtime!

One bright moment in the class happened when I was trying to add hands and feet to the clowns. The icing kind of sputtered out in a weird way on one of the hands, and it looks like the clown is giving a thumbs up!! I couldn't have done that again if I had tried! Everyone got a good laugh out of it.


Better Cake
On March 24 we decorated our "graduation" cake. This class was devoted to learning how to make roses. I thought it would be difficult because of the intricacy involved, but I never considered that I would have trouble due to hand cramps! Seriously, my hand got so tired from squeezing that pastry bag. I had a bunch of trouble with these at first. The icing was cracking, falling off, etc. I couldn't make anything resembling anything close to a flower! But towards the end of class I was able to at least put something together that had multiple petals, despite the fact that they were cracked, stumpy petals. And I was proud of myself for persevering. A lot of women in the class (yes, it was all women) were frustrated as well but one of them went so far as to give up completely.


The cake was decorated with an arrangement of roses on top, and I did dots again which were a little better this week. I will say that doing the leaves on the roses was really easy!

All in all, I did enjoy taking this class, despite my frustrations. I don't think I'll be selling cakes, which some students come out of that class wanting to do, but I think that with a little practice I could get better at this. I am looking forward to making my next cake that is NOT for class and decorating it however I like. I would also like to experiment with using different types of icing as well, because I didn't really like the icing recipe that was used for class.

I learned a lot and now own some supplies that I can use again and again. One conclusion I came to after trying a different brand of cake mix each week is that I felt the Duncan Hines mix made the best cake. I thought Pillsbury was the worst because it was really crumbly. The Betty Crocker mix was somewhere in the middle.

There are three more levels of cake decorating courses offered at the craft store, and I may choose to take another one in the future. For right now though I'm a little "caked out."

Saturday, March 14, 2009

Cake Class

A few weeks ago I decided to enroll in a cake decorating course. I have always enjoyed baking and this was something I had thought would be fun to do for a long time.

It's a 4-week course being offered at a local craft store. Each class lasts two hours. During the first week's class we didn't actually do any decorating but just learned about how to make the icing, how to make it in different consistencies that would be useful for different types of decorations, how to level a cake, and we got some guidance on what supplies to buy for class.

For the second class, we had to bring an 8-inch cake that had been iced with a base coat. In class we would practice techniques for a few types of decorations, and then we would decorate the cake.

In the first class we learned a few tips for baking and prepping the cake that, as one girl in the class said, were "worth the price of admission alone." One tip was for greasing the pans: rather than spraying the pan with Pam, or messing with greasing and flouring the pan, we learned to make a "cake release": mix well equal parts of shortening, vegetable oil, and all-purpose flour and then brush this mixture all over the pan with a pastry brush. It worked really well and my cake came out of the pan with nothing sticking to it.

Another tip we learned was to ice the cake with a "crumb coat" first. This is a really thin layer of icing that traps in it any crumbs on the outside of the cake. You let it set up for about half an hour, and then when you put on the 'real' coat of icing you get a smoother finish. Here is a picture of my cake with the crumb coat on it:

Now here's what I felt was the most useful tip I learned. After you put on the final coat of icing, here's how you can get a really smooth finish: wait about half an hour for the icing to set, and then place a piece of parchment paper on top of it. Rub your spatula on top of the paper to smooth out the icing. Here's a shot from before and after I did that:

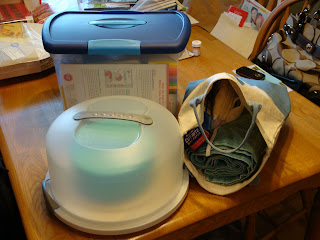
So once my cake was ready to go, I had to pack up all the supplies that were needed for the 2nd-week class. And it was a LOT of stuff. That is one minor complaint I had about this course. The course itself is not expensive, but you have to buy a lot of supplies. Here's a picture of everything loaded up and ready to go to class:

In class we practiced making stars, curved lines, zigzag, dots, outlining, and writing. Then we used some of those techniques to decorate our cake. The sample cake in the book had a big ugly rainbow on it, but I decided to make a hot air balloon instead. Class was actually slightly stressful because we didn't have much time to finish everything, but I finished it when I got home.


There were a few mishaps as I was decorating... I kept accidentally putting my fingers in the sides of the cake. Exhibit A:


So when it was time to try the cake I just cut out a piece that had my giant thumb gouge in it.

It was pretty good! I'm looking forward to doing the cake for week three, although it involves creepy clowns... stay tuned!

Tuesday, March 3, 2009

Smoothies


My work is kind enough to allow employees to telecommute one day a week. Once nice perk of telecommuting is that I can whip up something in the kitchen for a meal or snack if I choose to. I took the above picture while I was on a conference call, with my work and a big orange smoothie in front of me. (That big Samuel Adams glass stein is the perfect size for a smoothie!)

One thing you may or may not know about me is that I LOVE DRINKS. I am pretty much drinking all day long. I'm the girl at the continental breakfast who has a coffee AND a water AND a juice. (However there are two drinks that come to mind that I don't particularly like... milk or tea.)

I've recently taken a liking to smoothies. I got a number of smoothie books from the library and I've been trying a few recipes. I've never been a big fruit eater, but I will drink fruit that's been blended into a drink. Take the one in the picture above... it has bananas in it. My mom will be shocked to know I actually bought bananas at the grocery store... I haven't eaten one of those since I've been old enough to feed myself! It also has mango in it. Trader Joe's has bags of frozen mango cubes that are perfect to use in smoothies.

The downside of smoothies is that the ones that taste the best often have sugary extras added, which probably cancel out the benefits of the fruit. This one had orange sherbet in it. But I could make it without adding the sherbet, or I could try it with some low-fat vanilla yogurt instead. I think I'll continue to experiment until I find something that is healthy but tasty without having too many calories (I'll have to cut back on the amount of ingredients used to achieve that last part. I certainly don't need a stein-full of smoothie every time.).

Here's the recipe for the smoothie I made today. I adapted it from a similar recipe in the book "Jamba Juice Power" by Kirk Perron. What I do is use frozen, chopped fruit, either like the frozen mango cubes I bought at Trader Joe's, or fruit I have purchased fresh and then chopped and frozen (like the banana). When I use frozen fruit I don't need to add ice.

1 cup orange juice
1/2 cup bananas
1 cup mangos
1 cup orange sherbet

Put everything into a blender and then blend until smooth!