Showing posts with label cake. Show all posts

Wednesday, March 25, 2009

Bad Cakes and Better Cakes (but still not Good)


Bad Cake

On March 17 I had my third of four cake classes, decorating the second of three cakes we would do in the course. In this class we learned shells and dots, which could be used for decorative touches and borders, as well as to pipe figures like the clown bodies shown above (the heads are little plastic pieces on stems that you stick into the icing). I was having a very "off" night and things did not go quite as well as I felt they had with my first cake-decorating attempt. There were probably a number of factors involved but one of them was definitely the fact that I was not looking forward to doing that week's clown cake. I think clowns are creepy! But I tried to make it fun and used white, green, and orange icing in honor of St. Patty's Day.

For some reason I was having a really tough time doing the shell decoration, which is embarrassing because that is supposed to be a pretty easy one! But they just weren't coming out right. When I went to pipe the shell border on the cake I tried using a color-striping technique, where you paint strips of the dye on the inside of your pastry bag so it makes stripes when you squeeze the icing through it. I used green stripes and white icing. But I was doing so poorly on the border that my teacher actually made me stop (more than once!) and practice on our practice boards before going back to the cake. But in doing so I ended up with noticeable differences in the placement of the color stripes and in the strength of the color on the cake. Towards the end, when I got to the bottom border there is almost no stripe at all! FAIL.

The second FAIL is those awful green dots on the top of the cake. The sample clown cake they showed in the book had dots on the side of the cake, but something was weird with the tackiness/consistency of my icing that night and when I tried to do dots on the side of the cake they were actually falling off!!! So I just sprinkled a bunch of them all over the top of the cake to fill up the empty space around the clowns. Ugh, it's so ugly it seriously belongs on Cake Wrecks. You know what though? Cake is cake, and when I set it out at work the next morning it was gone by lunchtime!

One bright moment in the class happened when I was trying to add hands and feet to the clowns. The icing kind of sputtered out in a weird way on one of the hands, and it looks like the clown is giving a thumbs up!! I couldn't have done that again if I had tried! Everyone got a good laugh out of it.


Better Cake
On March 24 we decorated our "graduation" cake. This class was devoted to learning how to make roses. I thought it would be difficult because of the intricacy involved, but I never considered that I would have trouble due to hand cramps! Seriously, my hand got so tired from squeezing that pastry bag. I had a bunch of trouble with these at first. The icing was cracking, falling off, etc. I couldn't make anything resembling anything close to a flower! But towards the end of class I was able to at least put something together that had multiple petals, despite the fact that they were cracked, stumpy petals. And I was proud of myself for persevering. A lot of women in the class (yes, it was all women) were frustrated as well but one of them went so far as to give up completely.


The cake was decorated with an arrangement of roses on top, and I did dots again which were a little better this week. I will say that doing the leaves on the roses was really easy!

All in all, I did enjoy taking this class, despite my frustrations. I don't think I'll be selling cakes, which some students come out of that class wanting to do, but I think that with a little practice I could get better at this. I am looking forward to making my next cake that is NOT for class and decorating it however I like. I would also like to experiment with using different types of icing as well, because I didn't really like the icing recipe that was used for class.

I learned a lot and now own some supplies that I can use again and again. One conclusion I came to after trying a different brand of cake mix each week is that I felt the Duncan Hines mix made the best cake. I thought Pillsbury was the worst because it was really crumbly. The Betty Crocker mix was somewhere in the middle.

There are three more levels of cake decorating courses offered at the craft store, and I may choose to take another one in the future. For right now though I'm a little "caked out."

Saturday, March 14, 2009

Cake Class

A few weeks ago I decided to enroll in a cake decorating course. I have always enjoyed baking and this was something I had thought would be fun to do for a long time.

It's a 4-week course being offered at a local craft store. Each class lasts two hours. During the first week's class we didn't actually do any decorating but just learned about how to make the icing, how to make it in different consistencies that would be useful for different types of decorations, how to level a cake, and we got some guidance on what supplies to buy for class.

For the second class, we had to bring an 8-inch cake that had been iced with a base coat. In class we would practice techniques for a few types of decorations, and then we would decorate the cake.

In the first class we learned a few tips for baking and prepping the cake that, as one girl in the class said, were "worth the price of admission alone." One tip was for greasing the pans: rather than spraying the pan with Pam, or messing with greasing and flouring the pan, we learned to make a "cake release": mix well equal parts of shortening, vegetable oil, and all-purpose flour and then brush this mixture all over the pan with a pastry brush. It worked really well and my cake came out of the pan with nothing sticking to it.

Another tip we learned was to ice the cake with a "crumb coat" first. This is a really thin layer of icing that traps in it any crumbs on the outside of the cake. You let it set up for about half an hour, and then when you put on the 'real' coat of icing you get a smoother finish. Here is a picture of my cake with the crumb coat on it:

Now here's what I felt was the most useful tip I learned. After you put on the final coat of icing, here's how you can get a really smooth finish: wait about half an hour for the icing to set, and then place a piece of parchment paper on top of it. Rub your spatula on top of the paper to smooth out the icing. Here's a shot from before and after I did that:

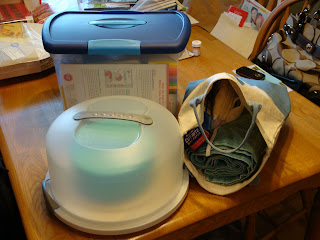
So once my cake was ready to go, I had to pack up all the supplies that were needed for the 2nd-week class. And it was a LOT of stuff. That is one minor complaint I had about this course. The course itself is not expensive, but you have to buy a lot of supplies. Here's a picture of everything loaded up and ready to go to class:

In class we practiced making stars, curved lines, zigzag, dots, outlining, and writing. Then we used some of those techniques to decorate our cake. The sample cake in the book had a big ugly rainbow on it, but I decided to make a hot air balloon instead. Class was actually slightly stressful because we didn't have much time to finish everything, but I finished it when I got home.


There were a few mishaps as I was decorating... I kept accidentally putting my fingers in the sides of the cake. Exhibit A:


So when it was time to try the cake I just cut out a piece that had my giant thumb gouge in it.

It was pretty good! I'm looking forward to doing the cake for week three, although it involves creepy clowns... stay tuned!

Tuesday, October 2, 2007

White Russian Cupcakes

Friday was my mom's birthday. My sisters and I went to her house to celebrate, and I decided to bake some cupcakes for the occasion. I had gotten the book Cupcakes: From the Cake Mix Doctor (by Anne Byrn, the same author of the doomed asparagus blue cheese pesto pasta recipe from a few posts ago) from the library and copied a bunch of recipes I wanted to try, so I emailed my mom the following list of flavors and asked her which she might like:

Pistachio
Pineapple Upside Down Cake
White Russian
Key Lime Pie
Lemon Chiffon
Chocolate
Orange Almond
Chocolate Peanut Butter

She responded favorably to the idea of White Russian or Chocolate Peanut Butter. The Chocolate Peanut Butter cupcake recipe I had was actually from a Barefoot Contessa cookbook, and was a 'from scratch' recipe, whereas all of the Anne Byrn recipes start with a cake mix, so I decided to go with the White Russian recipe.
Here it is:
Cupcakes:
1 package (18.25 ounces) plain yellow cake mix
1 package (3.4 ounces) vanilla instant pudding
1 cup vegetable oil
3/4 cup whole milk
4 large eggs
1/4 cup vodka
1/4 cup plus 2 tablespoons Kahlua
1 teaspoon pure vanilla extract
Kahlua Whipped Cream:
1 cup heavy (whipping) cream
2 tablespoons confectioners' sugar
1 tablespoon Kahlua
2 tablespoons semisweet chocolate shavings
1. Place a rack in the center of the oven and preheat the oven to 350 degrees Fahrenheit. Line 24 cupcake cups with paper lines. Set the pans aside.
2. Prepare the cupake batter: Place the cake mix, pudding mix, oil, milk, eggs, vodka, 1/4 cup Kahlua, and vanilla in a large mixing bowl. Blend with an electric mixer on low speed for 30 seconds. Stop the machine and scrape down the sides of the bowl with a rubber spatula. Increase the mixer speed to medium and beat 2 minutes more, scraping down the sides again if needed. Spoon or scoop 1/3 cup batter into each lined cupcake cup, filling it three quarters of the way full. Place the pans in the oven.
3. Bake the cupcakes until they are golden and spring back when lightly pressed with your finger, 17 to 20 minutes. Remove the pans from the oven and place them on wire racks to cool for 5 minutes. Brush the tops of the cupcakes with the remaining 2 tablespoons Kahlua. Run a dinner knife around the edges of the cupcake liners, lift the cupcakes up from the bottoms of the cups using the end of the knife, and pick them out of the cups carefully with your fingertips. Place them on a wire rack to cool for 15 minutes before frosting.
4. Meanwhile, prepare the frosting: Place a large, clean mixing bowl and electric mixing beaters in the freezer to chill for 1 minute. Remove the bowl and beaters from the freezer. Pour the cream into the bowl and beat with an electric mixer on high speed until the cream has thickened, 1 1/2 minutes. Stop the machine and add the sugar and Kahlua. Beat the cream on high speed until stiff peaks form, 1 to 2 minutes more.
5. Place a heaping tablespoon of the whipped cream on each cupcake and swirl to spread it out with a short spatula or a spoon, taking care to cover the tops completely. Garnish with chocolate shavings. The cupcakes are ready to serve. Store these cupcakes, in a cake saver, in the refrigerator, for up to 4 days.

The cupcakes were pretty good! I was a little surprised at how heavy the alcohol favor was in the baked cupcakes, and it really did taste like a White Russian. I did not like the whipped cream icing... it just seemed a little too light. if I made these again I would try to use some sort of butter cream icing with Kahlua in it. I would recommend this recipe and I can't wait to try others from this book.

Sunday, September 16, 2007

Carrot Cake


I remembered while eating one of the last slices of this cake that I hadn't taken any photos of it. Hence the dirty fork and crumbs everywhere in this one. This photo does not do the cake justice. It was delicious.


I had decided to bake a carrot cake for a few reasons. I had been thinking about making one since my friend Jen's wedding a few weeks ago. Each layer of her wedding cake was a different flavor, one of which was carrot cake. It was amazing! I also wanted to take a dessert to Sue and Bruin's house on Friday, and Bruin can't eat anything with chocolate in it because he is allergic to caffeine (gasp!), so I had to think of something without chocolate. Since I had plenty of baby carrots in the fridge, I thought the carrot cake was a perfect choice.


The recipe I used is from a cookbook called Best of the Best from Ohio: Selected Recipes from Ohio's Favorite Cookbooks. The book was edited by Gwen McKee and Barbara Moseley, who have made compilation cookbooks like this for almost every state in the US. (I found out about them after buying Best of the Best from Georgia while on vacation this summer with my mom and sisters on Tybee Island. I borrowed the Ohio edition from my library.) The carrot cake recipe originally came from A Taste of Columbus Vol IV, which seems to be out of print but I would assume is a compilation of recipes from Columbus-area chefs, because the recipe notes that it was contributed by Chef Jim Girvis of the French Loaf.


Here is the recipe:


4 large eggs

1-1/2 cups oil

2 cups flour

2 teaspoons baking soda

2 teaspoons baking powder

1-1/2 teaspoons salt

2 teaspoons cinnamon

2 cups sugar

1 (8-1/3 ounce) can crushed pineapple in juice, drained

2 cups (packed) peeled and shredded carrots

1/2 cup chopped nuts (I used almonds because that's what I had, but if I made it again I would use pecans or walnuts)


Place eggs and oil in mixing bowl and blend well. Sift together flour, soda, baking powder, salt, cinnamon, and sugar. Add to egg mixture and blend thoroughly. Add pineapple, carrots, and nuts. Mix well. Pour into greased 13 x 9 inch pan. Bake at 350 degrees for 35-40 minutes. Allow to cool.


Frosting:

1/2 cup butter

1 (8-ounce) package cream cheese, softened

1 teaspoon vanilla

1 (1-pound) box confectioner's sugar


Cream together butter, cream cheese, and vanilla. Add sugar and beat well. Frost cake and refrigerate for 2 days before serving.


I ended up baking it a little longer than called for because after 35 minutes it was still jiggly in the middle. I probably baked it for 45-50 minutes. It was really golden brown but I thought it would be better to have it be a little overdone on the edges rather than undercooked in the middle. When the cake cooled, I tasted a sliver to make sure it came out okay before making the icing. It was consistently very moist throughout. Maybe a little too moist for my liking.

I took half the cake to dinner on Friday and the other half to Bluffton on Saturday. Everyone seemed to like it, so that's good! I thought it was pretty delicious but I might want to try a different carrot cake recipe sometime to see if I can get one that's not so moist. But I would definitely recommend this recipe.